
(1) When your sister suggests that as a joint birthday gift for herself and her husband, agree readily. Assure your sister that it will be no problem, just a few straight seams, easy really.
(2) Work out a deal with your mother in which you will do the labor and she will pay for the fabric, allowing you both to give your sister and her husband a gift in a nice Marxist way (each according her her ability...)
(3) Send your sister some fabric web sites. Suggest that she and her husband pick out a fabric. Make a few suggestions of your own.
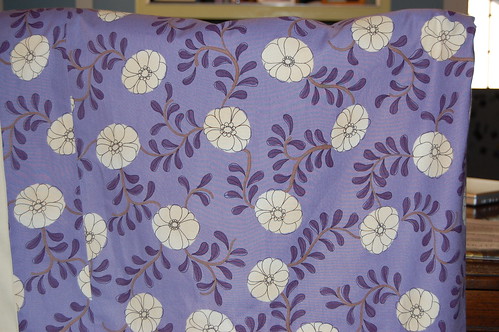
(4) Receive email from your sister with several options, including a lovely but obscenely expensive Marimekko print and a much less expensive Moda fabric. Discuss and agree up the idea of incorporating your sister and brother-in-law's chuppah in the design.
(5) Engage in several more rounds of fabric discussion, finally settling on the Moda print. Fail to consider that, as this is a Moda print, it will go out of stock quickly and not be re-produced by the manufacturer. Allow months to go by while you are busy at the beach, with friends, and in the garden.
(6) Finally get around to purchasing the fabric, only to realize that it is out of stock at your local mega fabric store and at most online shops. Find one online shop that carries it, and order 7 yards.
(7) Wait another month and then purchase two 600 thread count sheet, one to go under the delicate chuppah fabric, the other for the bottom of the comforter cover, to accommodate your brother-in-law's preference for a very soft comforter. Feel glad that the sheet is on sale. Feel even gladder that you have been carting around that 15% off coupon in your wallet for 3 months.
(8) Get the sheets home and realize that the white chuppah will look horrible with the main fabric's purple and cream print and the dark cream sheet. Decide not to use the chuppah. Return the second sheet.
(9) Call the online fabric merchant and experience the most amazing customer service. (Although the seller did not have any more of the pattern, the owner of this one woman shop called Moda to see if they still make the print. When she called me back to say that Moda doesn't make this print any more, she suggested I check several of her competitors' web sites to see if they might have any. She even suggested specific competitor sites that were likely to have it.)
(10) Take the nice quilt lady's advice and find another vendor that carries the fabric. Order 3 more yards.
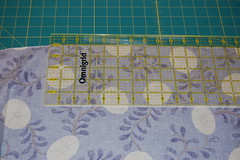
(11) Once the fabric arrives, wash the sheet and all 10 yards of the purchased fabric Press all 10 yards. Press the sheet, cursing the whole time.
(12) Wait another few weeks while you nightly feel crappy and first-trimester nauseous.
(13) Finally get off your butt and start calculating measurements. Recalculate all measurements after talking to husband about said calculations. Re-recalculate, and then go to bed.
(14) Months after you agreed to start the project, start sewing. Quickly realize that the hard part of the project is handling 94 inch long pieces of fabric.

(15) Sew all four pieces of the comforter top together, and fiddle around while deciding how best to attach the back.
(16) Sew the front piece to the sheet and realize you have slightly miscalculated the measurements. Decide to ignore the problem, figuring most of the error will be hidden by the seams.
(17) Practice making button holes. Panic that they will look crappy.
(18) Measure fabric and decide how many buttons you need to keep the comforter from poking out of the cover.
(19) Go to the crazy button store and spend way too much time picking out buttons that will match the fabric and are sturdy enough to survive the washer and drier without breaking. Cleverly purchase two more buttons than you plan to use, just in case.
(20) Get over panic and start sewing button holes. Decide that although they look a little wonky, no one will really notice because the buttons will cover the holes.
(21) Realize that your want four more buttons than you originally thought you wanted. Return to the crazy button store for two more buttons.

(22) Hand sew buttons all evening in order to be sure the project will be done in time to mail it on Monday before you leave town for Thanksgiving.
(23) Iron the entire duvet cover so it will look nice. Ignore nagging voice telling you that once you fold it to put it in the box it will get all wrinkly again.
(24) Carefully insert folded duvet cover into a plastic bag, then put the bag and a note into the mailing box. Address the box at the post office. Call your sister to confirm zip code. Wake up said sister in the process.
(25) Fail to confirm street address with sleepy sister, and incorrectly address box.
(26) Buy delivery confirmation and insurance for package which you have just mis-addressed. Mail package.
(27) Wait 4 days.
(28) Call sister and ask if she has gotten your package. When she says she has not, consider what could have gone wrong. Realize you have mis-addressed package.
(29) Dream about the package on two consecutive nights.
(30) Nine days after you mail the ill-fated package, talk to your local postal worker, who cheerfully tries to convince you that it will all work out all right - either your sister's postal worker will figure out the problem and get the package to her anyway, or it will be returned to you after what he figures should be a few days. Feel impressed by the extent to which your mail carrier takes pride in his work.
(31) Two days later, still see no evidence of the package and hear nothing from your sister that suggests she's gotten it.
(32) Sigh heavily. Regret that you did not take more pictures of the duvet cover. Realize the amount of insurance purchased will not cover the cost of materials, much less the time the project took. Sigh again.
(33) Twelve days after you mailed the package, return to the house to find it on the front porch. Do a quick happy dance and drag the box inside. Open the box, add a second item to make up for the tardiness, reseal and re-label with the correct address. Slather with tape.
(34) Rush to the post office to mail the package. Wait for your sister to call and tell you she's received the package and that the duvet cover is the best one you'd ever made. Fire up the computer to write a tutorial.


You are rather awesome.
ReplyDeleteI made a duvet cover once by sewing two sheets together and adding snaps along one side. NO CUTTING.
It's the best duvet cover she's ever seen. Really.
ReplyDeleteI will never complain again about having to drive ALL THAT WAY for linens. Because the alternative does not sound pleasant. Not at all.
ReplyDeleteThe actual MAKING was not so difficult, I just managed to string it out over months and months and make it a bigger deal than it should have been.
ReplyDeleteOh. Dear.
ReplyDeleteIt's a fab quilt cover, though. Hope she reads this blog or someone in your family who knows about it "accidentally" points her at it.
And I love the Happy Dance.
Wow. You are a good sister. I never get past the buying.
ReplyDeleteI do love that button store.
This is exactly what frightens me about sewing.
ReplyDeleteAudentes fortuna iuvat
As I don't even own a sewing machine, this will never ever be helpful to me. But I love *your* work. It's lovely, despite the hardships involved with its birth.
ReplyDeleteI really enjoyed your tutorial. I laughed and learned so much. I guess I will get started on the duvet I promised my sister I would have for my little 3 year old neice's birthday.
ReplyDeleteP.S. Your duvet was absolutely breathtaking!!!
Thanks Anonymous! I saw it in action on my sister's bed. I was pretty happy with how it looked.
ReplyDeleteI laughed and learned so much. I guess I will get started on the duvet I promised my sister I would have for my little 3 year old neice's birthday.
ReplyDelete